Actions
Actions represent a scripted logic for executing a set of commands to automate the tasks. The system provides a default list of actions and possibility to script custom actions using API calls, Linux bash shell command, JS, and Java scripts. Any action, available to be performed by means of API (including custom scripts running), should be bound to some event and executed as a result of this event occurrence.
With the help of actions you can achieve automation of the tasks related to:
-
increasing or decreasing CPU or RAM amount
-
adjusting essential configs
-
restarting a service or a container
-
applying a database patch
The default workflow for any action execution is the following:
-
replacing placeholders
-
getting a list of target containers
-
checking permissions
-
executing the action itself
Thus, the following specific groups of actions are singled out:
Container Operations
There are actions that perform operations inside of a container. For a detailed guidance on how to set a target container, visit the Specifying Target Containers page.
Any container operation can be performed using a cmd action. Moreover, there are also some additional actions provided for your convenience. Thus, all the actions performed in confines of a container can be divided into three groups:
-
SSH commands (cmd)
-
operations with files (createFile, createDirectory, writeFile, appendFile, replaceInFile)
Note
To process any container operation (except for cmd), the Cloud Scripting engine applies a default system user with restricted permissions.
cmd
The cmd action executes commands in synchronous and asynchronous modes. Within one container the cmd actions can be performed in synchronous mode only. Within one environment cmd actions can be performed asynchronously in case similar actions are required to be executed on different nodeGroups.
Example
cmd [nodeId,nodeType,nodeGroup]:
  - cmd1
  - cmd2
sayYes: true
{
  "cmd [nodeId,nodeType,nodeGroup]": [
    "cmd1",
    "cmd2"
  ],
  "sayYes" : true
}
where:
nodeId,nodeGroup,nodeType- parameters that determine target containers for the action execution (at least one of these parameters is required)cmd1andcmd2- set of commands that are executed. Their values are wrapped by the Cloud Scripting engine via echo cmd | base64 -d | su user where:- cmd - is equal to the Base64 encoded string: yes | (cmd1;cmd2). If your commands require the interactive input, by default, the Cloud Scripting engine always gives a positive answer, using yes utility.
- user - default system user with restricted permissions
sayYes[optional] - parameter that enables or disables the usage of yes utility. The default value is 'true'.
The single SSH command can be passed in a string. For example, running a bash script from URL on all Tomcat 6 nodes asynchronously.
cmd [tomcat6]: curl -fsSL http://example.com/script.sh | /bin/bash -s arg1 arg2
{
  "cmd [tomcat6]": "curl -fsSL http://example.com/script.sh | /bin/bash -s arg1 arg2"
}
The same action can be performed asynchronously on all nodes of specific nodeGroup or several ones provided as the list: [cp, bl].
cmd [cp, bl]: curl -fsSL http://example.com/script.sh | /bin/bash -s arg1 arg2
{
  "cmd [cp, bl]": "curl -fsSL http://example.com/script.sh | /bin/bash -s arg1 arg2"
}
If necessary cmd action can be executed on all nodes of all available nodeGroups within one environment. Action will be performed asychronously as well.
cmd [*]: curl -fsSL http://example.com/script.sh | /bin/bash -s arg1 arg2
{
  "cmd [*]": "curl -fsSL http://example.com/script.sh | /bin/bash -s arg1 arg2"
}
The default cmd parameter is commands. It can be useful to set a several commands in the same cmd action. For example:
type: update
name: Cmd commands

onInstall:
  cmd:
    - echo 'Hello ' >> /tmp/CmdResponse.txt
    - echo 'World ' >> /tmp/CmdResponse.txt
  nodeGroup: cp
{
  "type": "update",
  "name": "Cmd commands",
  "onInstall": {
    "cmd": [
      "echo 'Hello ' >> /tmp/CmdResponse.txt",
      "echo 'World!!!' >> /tmp/CmdResponse.txt"
    ],
    "nodeGroup": "cp"
  }
}
While accessing a container via cmd, you receive all the required permissions and additionally can manage the main services with sudo commands of the following types (and others).
sudo /etc/init.d/jetty start
sudo /etc/init.d/mysql stop
sudo /etc/init.d/tomcat restart
sudo /etc/init.d/memcached status
sudo /etc/init.d/mongod reload
sudo /etc/init.d/nginx upgrade
sudo /etc/init.d/httpd help
Examples
Setting SSH commands in an array.
cmd [tomcat6]:
  - curl -fsSL http://example.com/script.sh | /bin/bash -s arg1 arg2
{
  "cmd [tomcat6]": [
    "curl -fsSL http://example.com/script.sh | /bin/bash -s arg1 arg2"
  ]
}
Downloading and unzipping the WordPress plugin on all the compute nodes. Here, the commands array is executed through a single SSH command. The same can be performed with the help of the unpack method.
cmd [cp]:
  - cd /var/www/webroot/ROOT/wp-content/plugins/
  - curl -fsSL \"http://example.com/plugin.zip\" -o plugin.zip
  - unzip plugin.zip
{
  "cmd [cp]": [
    "cd /var/www/webroot/ROOT/wp-content/plugins/",
    "curl -fsSL \"http://example.com/plugin.zip\" -o plugin.zip",
    "unzip plugin.zip"
  ]
}
Using sudo to reload Nginx balancer.
cmd [nginx]:
  - sudo /etc/init.d/nginx reload
{
  "cmd [nginx]": [
    "sudo /etc/init.d/nginx reload"
  ]
}
api
Executing actions available by means of Jelastic Cloud API.
There are a number of parameters required by Jelastic API that are defined automatically:
-
envName - environment domain name where the API method is executed
-
appid - unique environment identifier that can be passed to API instead of envName
-
session - unique session of a current user
Target containers, specified for the API methods execution can be passed by the nodes keywords. Therefore, API methods can be run on all nodes within a single nodeGroup (i.e. layer) or nodeType asynchronously or in other words in parallel. Also, API methods can be run on a particular node(s). In this case, the Node ID is required that is available either through the node placeholders, or a set of custom action parameters (${this}).
All of the nodes keywords and/or Node IDs can be passed as a list within one api action that allows to execute it asynchronously on all specified nodes. In case the action should be executed on all environment nodes you can use wildcards api[*].
Note
Passing nodes keywords and Node IDs within api action make sure the api method can take them as input parameters.
Some api methods allow to control how to execute action within particular nodeGroup synchronously or asynchronously with help of isSequential parameter. In case isSequential: true the actions within nodeGroup executed on the nodes one by one according to their Node Ids(ascending).
Examples
Restarting all compute nodes in the environment.
api [cp]: jelastic.environment.control.RestartNodes
{
    "api [cp]" : "jelastic.environment.control.RestartNodes"
}
api [cp]- target node group for the API method execution ([cp])- jelastic.environment.control.RestartNodes - Jelastic API method for restarting nodes by group
This method (jelastic.environment.control.RestartNodes) can be simplified like shown in the next example.
api [cp]: environment.control.RestartNodes
{
    "api [cp]" : "environment.control.RestartNodes"
}
Restarting all compute and load balancer nodes in the environment.
api [cp, bl]: environment.control.RestartNodes
{
    "api [cp, bl]" : "environment.control.RestartNodes"
}
Restarting all compute and load balancer nodes and specific node from another layer (e.g. sqldb node) within one environment.
api [cp, bl, ${nodes.sqldb[0].id}]: environment.control.RestartNodes
{
    "api [cp, bl, ${nodes.sqldb[0].id}]" : "environment.control.RestartNodes"
}
Synchronous action execution example within compute node layer using isSequential parameter.
type: update
name: Event Subscription Example

onInstall:
  isSequential: true
  api [cp]: env.control.RestartNodes
{
  "type": "update",
  "name": "Event Subscription Example",
  "onInstall": {
    "isSequential": true,
    "api [cp]": "env.control.RestartNodes"
  }
}
Below, you can find one more approach to specify a target node group for the API method execution.
api: jelastic.environment.control.RestartNodes,
nodeGroup: cp
{
    "api" : "jelastic.environment.control.RestartNodes",
    "nodeGroup" : "cp"
}
There is an default parameter method for api action. This parameter is useful while setting few api method in one api action. For example:
type: update
name: API action

onInstall:
  api:
    - method: environment.file.Create
      params:
        nodeGroup: cp
        path: /tmp/exampleFile.txt
    - method: environment.control.RestartNodes
      params:
        nodeGroup: cp
{
    "type": "update",
    "name": "API action",
    "onInstall": {
        "api": [{
            "method": "environment.file.Create"
            "params": {
                "nodeGroup": "cp",
                "path": "/tmp/exampleFile.txt"
            }
        },{
            "method": "environment.control.RestartNodes"
            "params": {
                "nodeGroup": "cp"
            }
        }]
    }
}
In example above there are two api methods Create file and RestartNodes. Every method has their own set of parameters which they are required.
The same parameters for all methods in one action can be set once. For example:
type: update
name: API action

onInstall:
  api:
    - method: environment.file.Create
      params:
        path: /tmp/exampleFile.txt
    - method: environment.control.RestartNodes
  nodeGroup: cp
{
    "type": "update",
    "name": "API action",
    "onInstall": {
        "api": [{
            "method": "environment.file.Create"
            "params": {
                "path": "/tmp/exampleFIle.txt"
            }
        }, {
            "method": "environment.control.RestartNodes"
        }],
        "nodeGroup": "cp"
    }
}
action.
deploy
Available for compute nodes (except for Docker containers)
deploy:
  archive:URL
  name: string
  context: string
{
  "deploy": [
    {
      "archive": "URL",
      "name": "string",
      "context": "string"
    }
  ]
}
archive- URL to the archive with a compressed applicationname- application's name that will be displayed at the dashboardcontext- desired context for the deployed app
upload
Available for all nodes
upload:
  - nodeId: number or string
    nodeGroup: string
    nodeType: string
    sourcePath: URL
    destPath: string
{
  "upload": [
    {
      "nodeId": "number or string",
      "nodeGroup": "string",
      "nodeType": "string",
      "sourcePath" : "URL",
      "destPath" : "string"
    }
  ]
}
nodeId,nodeGroup,nodeType- parameters that determine target containers for the action execution (at least one of these parameters is required)sourcePath- URL to download an external filedestPath- container path where the uploaded file is to be saved
unpack
Available for all nodes
unpack:
  - nodeId: number or string
    nodeGroup: string
    nodeType: string
    sourcePath: URL
    destPath: string
{
  "unpack": [
    {
      "nodeId": "number or string",
      "nodeGroup": "string",
      "nodeType": "string",
      "sourcePath" : "URL",
      "destPath" : "string"
    }
  ]
}
nodeId,nodeGroup,nodeType- parameters that determine target containers for the action execution (at least one of these parameters is required)sourcePath- URL to download an external archivedestPath- container path where the uploaded archive is to be unpacked
createFile
Available for all nodes
createFile [nodeId, nodeGroup, nodeType]: string
{
  "createFile [nodeId, nodeGroup, nodeType]": "string"
}
nodeId,nodeGroup,nodeType- parameters that determine target containers for the action execution (at least one of these parameters is required)string- container path where a file is to be created
There is an ability to create few files in the same target node in one createFile action. In this case parameter path is needed. For example:
type: update
name: Create File action

onInstall:
  createFile:
    - path: /tmp/firstFile
    - path: /tmp/secondFile
  nodeGroup: cp
{
    "type": "update",
    "name": "Create File action",
    "onInstall": {
        "createFile": [{
            "path": "/tmp/firstFile"
        },{
            "path": "/tmp/secondFile"
        }],
        "nodeGroup": "cp"
    }
}
In the example above the parameter nodeGroup is the same for two createFile actions. A target nodes can be specified separately in every method:
type: update
name: Create File action

onInstall:
  createFile:
    - path: /tmp/firstFile
      nodeGroup: sqldb
    - path: /tmp/secondFile
      nodeGroup: cp
{
    "type": "update",
    "name": "Create File action",
    "onInstall": {
        "createFile": [{
            "path": "/tmp/firstFile",
            "nodeGroup": "sqldb"
        },{
            "path": "/tmp/secondFile",
            "nodeGroup": "cp"
        }]
    }
}
createDirectory
Available for all nodes
createDirectory [nodeId, nodeGroup, nodeType]: string
{
  "createDirectory [nodeId, nodeGroup, nodeType]": "string"
}
nodeId,nodeGroup,nodeType- parameters that determine target containers for the action execution (at least one of these parameters is required)string- container path where a directory is to be created
There is an ability to create few directories in the same target node in one createDirectory action. In this case parameter path is needed. For example:
type: update
name: Create Directory action

onInstall:
  createDirectory:
    - path: /tmp/firstDirectory
    - path: /tmp/secondDirectory
    nodeGroup: cp
{
    "type": "update",
    "name": "Create Directory action",
    "onInstall": {
        "createDirectory": [{
            "path": "/tmp/firstDirectory"
        },{
            "path": "/tmp/secondDirectory"
        }],
        "nodeGroup": "cp"
    }
}
In the example above the parameter nodeGroup is the same for two createDirectory actions. Target nodes can be specified separately in every method:
type: update
name: Create Directory action

onInstall:
  createDirectory:
    - path: /tmp/firstDirectory
      nodeGroup: sqldb
    - path: /tmp/secondDirectory
      nodeGroup: sqldb
{
    "type": "update",
    "name": "Create Directory action",
    "onInstall": {
        "createDirectory": [{
            "path": "/tmp/firstDirectory",
            "nodeGroup": "sqldb"
        },{
            "path": "/tmp/secondDirectory",
            "nodeGroup": "cp"
        }]
    }
}
writeFile
Available for all nodes
writeFile:
  nodeId: number or string
  nodeGroup: string
  nodeType: string
  path: string
  body: string
{
  "writeFile": {
      "nodeId": "number or string",
      "nodeGroup": "string",
      "nodeType": "string",
      "path" : "string",
      "body" : "string"
    }
}
nodeId,nodeGroup,nodeType- parameters that determine target containers for the action execution (at least one of these parameters is required)path- container path where a file is to be writtenbody- content that is saved to a file
appendFile
Available for all nodes
appendFile:
  nodeId: number or string
  nodeGroup: string
  nodeType: string
  path: string
  body: string
{
  "appendFile": {
      "nodeId": "number or string",
      "nodeGroup": "string",
      "nodeType": "string",
      "path" : "string",
      "body" : "string"
    }
}
nodeId,nodeGroup,nodeType- parameters that determine target containers for the action execution (at least one of these parameters is required)path- container path where a file is to be appendedbody- content saved to a file
replaceInFile
Available for all nodes
replaceInFile:
  nodeId: number or string
  nodeGroup: string
  nodeType: string
  path: string
  replacements:
    - pattern: string
      replacement: string
{
  "replaceInFile": {
      "nodeId": "number or string",
      "nodeGroup": "string",
      "nodeType": "string",
      "path" : "string",
      "replacements" : [{
        "pattern" : "string",
        "replacement" : "string"
      }]
    }
}
where:
nodeId,nodeGroup,nodeType- parameters that determine target containers for the action execution (at least one of these parameters is required)path- path where a file is availablereplacements- list of replacements within the node's configuration filespattern- regular expressions to find a string (e.g. app\.host\.url\s=\s*.**)replacement- you can use as a replacement any string value, including any combination of placeholders
Topology Nodes Management
The present section introduces actions that are provided for managing the topology.
addNodes
addNodes:
  - nodeType: string
    nodeGroup: string
    extip: boolean
    fixedCloudlets: number
    flexibleCloudlets: number
    displayName: string
    dockerName: jelastic/wordpress-web:latest
    registryUrl: string
    registryUser: string
    registryPassword: string
    dockerTag: string
    dockerLinks: sourceNodeGroup:alias
    dockerEnvVars: object
    dockerVolumes: array
    dockerRunCmd: array
    dockerEntryPoint: object
{
  "addNodes": [
    {
      "nodeType": "string",
      "nodeGroup": "string",
      "extip": "boolean",
      "fixedCloudlets": "number",
      "flexibleCloudlets": "number",
      "displayName": "string",
      "dockerName": "jelastic/wordpress-web:latest",
      "registryUrl": "string",
      "registryUser": "string",
      "registryPassword": "string",
      "dockerTag": "string",
      "dockerLinks": "sourceNodeGroup:alias",
      "dockerEnvVars": "object",
      "dockerVolumes": "array",
      "dockerRunCmd": "array",
      "dockerEntryPoint": "object"
    }
  ]
}
nodeType[required] - parameter to specify software stacks. For Docker containers the nodeType value is docker.nodeGroup[optional] - the defined node layer.extip[optional] - attaching the external IP address to a container. The default value is 'false'.fixedCloudlets[optional] - number of reserved cloudlets. The default value is '0'.flexibleCloudlets[optional] - number of dynamic cloudlets. The default value is '1'.displayName[optional] - node's display name (i.e. alias)
The following parameters are required for Docker containers only:dockerName[optional] - name and tag of Docker imageregistryUrl[optional] - custom Docker registryregistryUser[optional] - Docker registry usernameregistryPassword[optional] - Docker registry passworddockerTag- Docker tag for installationdockerLinks[optional] - Docker linkssourceNodeGroup- source node to be linked with another nodealias- prefix alias for linked variables
dockerEnvVars[optional] - Docker environment variablesdockerVolumes[optional] - Docker node volumesdockerRunCmd[optional] - Docker run configsdockerEntryPoint[optional] - Docker entry points
setNodeDisplayName
Available for all nodes
setNodeDisplayName [nodeId, nodeGroup, nodeType]: string
{
  "setNodeDisplayName [nodeId, nodeGroup, nodeType]": "string"
}
nodeId,nodeGroup,nodeType- parameters that determine target containers for the action execution (at least one of these parameters is required)string- node’s display name (i.e. alias)
The action setNodeDisplayName has the default parameter called displayName. It is useful to set display name for few node layers in the same action. For example:
type: update
name: setNodeDisplayName example

onInstall:
  setNodeDisplayName:
    - displayName: Compute Nodes
      nodeGroup: cp
    - displayName: SQL Nodes
      nodeGroup: sqldb
{
  "type": "update",
  "name": "setNodeDisplayName example",
  "onInstall": {
    "setNodeDisplayName": [
      {
        "displayName": "Compute Nodes",
        "nodeGroup": "cp"
      },
      {
        "displayName": "SQL Nodes",
        "nodeGroup": "sqldb"
      }
    ]
  }
}
setNodeCount
Available for all nodes
The setNodeCount action allows to add or remove nodes that are grouped according to the same nodeGroup (layer). The node selector is available by nodeId, nodeGroup, or nodeType.
setNodeCount [nodeId, nodeGroup, nodeType]: number
{
  "setNodeCount [nodeId, nodeGroup, nodeType]": "number"
}
where:
nodeId,nodeGroup,nodeType- parameters that determine target containers for the action execution (at least one of these parameters is required)number- total number of nodes after the action is finished
The action setNodeCount has it own default parameter - count. It is useful to set node count for few node layers in one action. For example:
type: update
name: setNodeCount example

onInstall:
  setNodeCount:
    - count: 3
      nodeGroup: cp
    - count: 5
      nodeGroup: sqldb
{
  "type": "update",
  "name": "setNodeCount example",
  "onInstall": {
    "setNodeCount": [
      {
        "count": 3,
        "nodeGroup": "cp"
      },
      {
        "count": 5,
        "nodeGroup": "sqldb"
      }
    ]
  }
}
action execution will be finished three compute nodes and five sql nodes will be available in the same environment.
setExtIpEnabled
Available for all nodes
The setExtIpEnabled action allows to enable or disable the external IP address attachment to a particular node or nodeGroup.
setExtIpEnabled [nodeId, nodeGroup, nodeType]: true or false
{
  "setExtIpEnabled [nodeId, nodeGroup, nodeType]": true or false
}
nodeId,nodeGroup,nodeType- parameters that determine target containers for the action execution (at least one of these parameters is required)trueorfalse- parameter that allows to attach or detach the external IP address
The action setExtIpEnabled has own default parameter enabled. It is useful in case to set external IP address status for few nodes in the same action. For example:
type: update
name: Set External IP Address

onInstall:
  setExtIpEnabled:
    - enabled: true
      nodeGroup: cp
    - enabled: false
      nodeGroup: sqldb
{
  "type": "update",
  "name": "Set External IP Address",
  "onInstall": {
    "setExtIpEnabled": [
      {
        "enabled": true,
        "nodeGroup": "cp"
      },
      {
        "enabled": false,
        "nodeGroup": "sqldb"
      }
    ]
  }
}
Therefore, compute nodes will have an external ip address and sql nodes will be without ext IPs.
restartServices
restartService is an alias.
Will be restarted only main service in container which is related to separate template.
restartService:
  - nodeId: number or string
    nodeGroup: string
{
  "restartService": [
    {
      "nodeId": "number or string",
      "nodeGroup": "string"
    }
  ]
}
nodeId,nodeGroup- parameters that determine target containers for the action execution (at least one of these parameters is required)
restartNodes
restartNode is an alias.
Available for all nodes (except for Elastic VPS)
restartNodes:
  - nodeId: number or string
    nodeGroup: string
    nodeType: string
    reboot: boolean
{
  "restartNodes": [
    {
      "nodeId": "number or string",
      "nodeGroup": "string",
      "nodeType": "string",
      "reboot": "boolean"
    }
  ]
}
nodeId,nodeGroup,nodeType- parameters that determine target containers for the action execution (at least one of these parameters is required)reboot- flag which determines in which way node should be restarted. Positive value means the whole container should be restarted (the similar action torestartContainer), the negative one value means only main service in current container will be restarted (the similar action torestartService).
restartContainers
The whole container will be restarted.
Available for all nodes
restartContainers:
  - nodeId: number or string
    nodeGroup: string
    nodeType: string
{
  "restartContainers": [
    {
      "nodeId": "number or string",
      "nodeGroup": "string",
      "nodeType": "string"
    }
  ]
}
nodeId,nodeGroup,nodeType- parameters that determine target containers for the action execution (at least one of these parameters is required)
addContext
Available for compute nodes (except for Docker containers)
addContext:
  - name: string
    fileName: string
    type: string
{
  "addContext": [
    {
      "name": "string",
      "fileName": "string",
      "type": "string"
    }
  ]
}
name- context’s namefileName- name of the file that is displayed at the dashboardtype- context type with the following possible values:ARCHIVEGITSVN
Database Operations
Within this section, you can find actions that are intended for managing database containers.
prepareSqlDatabase
Available for SQL databases (except for Docker containers)
prepareSqlDatabase:
  - nodeId: number or string
    nodeGroup: string
    nodeType: string
    loginCredentials:
      user: string
      password: string
    newDatabaseName: string
    newDatabaseUser:
      name: string
      password: string
{
  "prepareSqlDatabase": [
    {
      "nodeId": "number or string",
      "nodeGroup": "string",
      "nodeType": "string",
      "loginCredentials": {
        "user": "string",
        "password": "string"
      },
      "newDatabaseName": "string",
      "newDatabaseUser": {
        "name": "string",
        "password": "string"
      }
    }
  ]
}
nodeId,nodeGroup,nodeType[optional] - parameters that determine target containers for the action execution. By default, the nodeGroup value is equal to sqldb.loginCredentials- root credentials from a new nodeuser- usernamepassword- password
newDatabaseName- your custom database namenewDatabaseUser- new user with privileges granted for a new database instancename- custom username that is set for a new databasepassword- custom password that is generated for a new database
Note
The action is executed only for mysql5, mariadb, and mariadb10 containers.
restoreSqlDump
Available for SQL databases (except for Docker container)
restoreSqlDump:
  - nodeId: number or string
    nodeGroup: string
    nodeType: string
    databaseName: string
    user: string
    password: string
    dump: URL
{
  "restoreSqlDump": [
    {
      "nodeId": "number or string",
      "nodeGroup": "string",
      "nodeType": "string",
      "databaseName": "string",
      "user": "string",
      "password": "string",
      "dump": "URL"
    }
  ]
}
nodeId,nodeGroup,nodeType[optional] - parameters that determine target containers for the action execution. By default, the nodeGroup value is equal to sqldb.databaseName- name of a database that is createduser- username in a database, on behalf of which an application is usedpassword- password in a database, on behalf of which an application is useddump- URL to application's database dump
applySqlPatch
Available for SQL databases (except for Docker containers)
applySqlPatch:
  - nodeId: number or string
    nodeGroup: string
    nodeType: string
    databaseName: string
    user: string
    password: string
    patch: string or URL
{
  "applySqlPatch": [
    {
      "nodeId": "number or string",
      "nodeGroup": "string",
      "nodeType": "string",
      "databaseName": "string",
      "user": "string",
      "password": "string",
      "patch": "string or URL"
    }
  ]
}
nodeId,nodeGroup,nodeType[optional] - parameters that determine target containers for the action execution. By default, the nodeGroup value is equal to sqldb.databaseName- name of a database for a patch to be applieduser- username in a database, on behalf of which an application is usedpassword- password in a database, on behalf of which an application is usedpatch- SQL query or a link to it. It is used only for SQL databases. Here, the placeholders support is available.
Note
The action is executed only for mysql5, mariadb, and mariadb10 containers.
User-Defined Operations
The current section provides data on the user-defined actions.
script
A script is an ability to executing custom Java or Javascript codes. Therefore, this advantage helps to realize a custom logic.
executeScript is deprecated alias.
The simplest way to use Java or JavaScript object in your manifest in example below:
type: update
name: Execute scripts

onInstall:
  script: return 'Hello World!';
{
  "type": "update",
  "name": "Execute scripts",
  "onInstall": {
    "script": "return 'Hello World!';"
  }
}
A custom scripts can be set via external links instead of a string.
The example execution result is a response type error with message "Hello World!".
The default action script type is javascript.
There is an ability to define language type or pass custom parameters. In this case the script action should be describe like in example below:
type: update
name: Execute scripts

script:
  script: return '${this.greetings}';
  params:
    greeting: Hello World!
  type: js
{
  "type": "update",
  "name": "Execute scripts",
  "script": {
    "script": "return '${this.greeting}';",
    "params": {
      "greeting": "Hello World!"
    },
    "type": "js"
  }
}
script- an object where are defined script code, optional parameters and language code typetype[optional] - script type with the following possible values (the default value is 'js'):js(javascript)an aliasjava
params[optional] - script parameters. Can be used in scripts like placeholder in example - ${this.greeting}
It is possible to execute script action asynchronously using node filtering. Thus this action can be performed in parallel on different nodes of the environment. For example:
nodeId filtering:
type: update
name: Execute scripts

onInstall:
  script [12345, 123456]: |
    return { result: 0, nodeId: nodeId };
{
  "type": "update",
  "name": "Execute scripts",
  "onInstall": {
    "script [12345, 123456]": "return { result: 0, nodeId: nodeId };"
  }
}
nodeGroup filtering:
type: update
name: Execute scripts

onInstall:
script [cp, bl]: |
  return { result: 0, nodeGroup: nodeGroup };
{
  "type": "update",
  "name": "Execute scripts",
  "onInstall": {
    "script [cp, bl]": "return { result: 0, nodeGroup: nodeGroup };"
  }
}
all nodes filtering:
type: update
name: Execute scripts

onInstall:
  script [*]: |
    return { result: 0, nodeId: nodeId };
{
  "type": "update",
  "name": "Execute scripts",
  "onInstall": {
    "script [*]": "return { result: 0, nodeId: nodeId };"
  }
}
nodeGroup and nodeId filtering:
type: update
name: Execute scripts

onInstall:
script [cp, 12345]: |
  return { result: 0, nodeGroup: nodeGroup };
{
  "type": "update",
  "name": "Execute scripts",
  "onInstall": {
    "script [cp, 12345]": "return { result: 0, nodeGroup: nodeGroup };"
  }
}
The script action provides an ability to execute Jelastic API in custom scripts. Therefore, it is easy to manage Jelastic environments by scripts.
There are ready-to-go solutions certified by Jelastic team.
Note
Learn more about using Jelastic Cloud API.
setGlobals
There are two scope levels during manifest execution - global and local. Global scope consists of several parameters like: env, nodes, globals and targetNodes.
This action is an ability to define variables within global scope. Suchwise, this is an opportunity to set values in object ${globals.}*.
For example:
type: update
name: setGlobals action
onInstall:
- setGlobals:
    a: 1
    b: 2
- assert: "'${globals.a}' === '1' && '${globals.b}' === '2'"
- checkGlobals
actions:
  checkGlobals:
    assert: "'${globals.a}' === '1' && '${globals.b}' === '2'"
{
    "type" : "update",
    "name" : "setGlobals action",

    "onInstall": [
        {
            "setGlobals": {
                "a": 1,
                "b": 2
            }
        },
        {
            "assert": "'${globals.a}' === '1' && '${globals.b}' === '2'"
        },
        "checkGlobals"
    ],

    "actions" : {
        "checkGlobals" : {
            "assert": "'${globals.a}' === '1' && '${globals.b}' === '2'"
        }
    }
}
The result is on the screen below:

First action setGlobals defines new global values - variables a and b. Then a new placeholders ${globals.a} and ${globals.b} are available in all next actions (custom actions are included too).
Note
Global scope is created at the beginning of JPS installation and it is available within current manifest only.
set
An ability to set local scope variables. Suchwise, new variables within ${this.}* scope could be defined. The example below shows a local scope borders within manifest and local variables usability:
type: update
name: Test action 'set'
onInstall:
- set:
    a: 1
    b: 2
- assert: "'${this.a}' === '1' && '${this.b}' === '2'"
- checkLocalVars:
    c: 3
    d: 4
actions:
  checkLocalVars:
  - assert:
    - "'${this.a}' !== '1' && '${this.b}' !== '2'"
    - "'${this.c}' === '3' && '${this.d}' === '4'"
  - set:
      a: 1
      b: 2
  - assert: "'${this.a}' === '1' && '${this.b}' === '2'"A
{
  "type": "update",
  "name": "Test action 'set'",
  "onInstall": [
    {
      "set": {
        "a": 1,
        "b": 2
      }
    },
    {
      "assert": "'${this.a}' === '1' && '${this.b}' === '2'"
    },
    {
      "checkLocalVars": {
        "c": 3,
        "d": 4
      }
    }
  ],
  "actions": {
    "checkLocalVars": [
      {
        "assert": [
          "'${this.a}' !== '1' && '${this.b}' !== '2'",
          "'${this.c}' === '3' && '${this.d}' === '4'"
        ]
      },
      {
        "set": {
          "a": 1,
          "b": 2
        }
      },
      {
        "assert": "'${this.a}' === '1' && '${this.b}' === '2'"
      }
    ]
  }
}
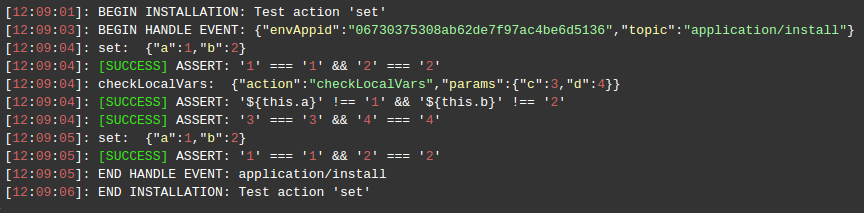
So from the screen results, it could understandable that local scope creates each time during a processing an event or while call custom actions. While execution custom action a local scope can consists of arguments if they pass with action. So these arguments will be in a custom action local scope.
assert
Is an ability to check two any values and verify results in console log. One of the useful case is checking response fields from previous action with expected values. Responses parameters can be compared with other parameters or with any hardcoded values. For example:
type: update
name: Assert action
onInstall:
- cmd [cp]: echo test
- assert:
  - "'${response.responses.out}' == 'test'"
  - "'${response.responses[0].out}' == 'test'"
{
  "type": "update",
  "name": "Assert action",
  "onInstall": [
    {
      "cmd [cp]": "echo test"
    },
    {
      "assert": [
        "'${response.responses.out}' == 'test'",
        "'${response.responses[0].out}' == 'test'",
      ]
    }
  ]
}
cmd action the first one. Here, echo command is executed with world test. The second action assert compares response output result form the first command and the word test.
The result can be check in console log panel like in example screen:

An assert action can be defined as an array of strings or in simple one line(string):
assert: "'${response.responses.out}' == 'test'"
{
  "assert": "'${response.responses.out}' == 'test'"
}
or as object like in cases below (in this case assert can be an array of string too):
message: test myvar
assert: "${this.myvar} === true"
{
  "message": "test myvar",
  "assert": "${this.myvar} === true"
}
or an array of objects:
assert:
- condition: "${this.myvar} === true"
  message: test myvar
- condition: true != false
  message: test simple condition
{
  "assert": [
    {
      "condition": "${this.myvar} === true",
      "message": "test myvar"
    },
    {
      "condition": "true != false",
      "message": "test simple condition"
    }
  ]
}
Failed comparing value will be marked in red colored text:

Also, there is an ability to set custom messages in console log instead default text ASSERT:
type: update
name: Assert action - custom message
onInstall:
- cmd [cp]: echo hello
- assert:
    condition: "'${response.responses.nodeid}' == '160008'"
    message: Custom Assert Message
{
  "type": "update",
  "name": "Assert action - custom message",
  "onInstall": [
    {
      "cmd [cp]": "echo hello"
    },
    {
      "assert": {
        "condition": "'${response.responses.nodeid}' == '160008'",
        "message": "Custom Assert Message"
      }
    }
  ]
}

Response placeholders in assert action are being defined only from the previous one action.
To check the result from the previous action, see the example:
{
  "type": "update",
  "name": "Assert action - script action assert",
  "onInstall": [
    {
      "cmd [cp]": "echo test"
    },
    {
      "script": [
        "return {",
        "   result : 0,",
        "   test: '123'",
        "};"
      ]
    },
    {
      "assert": [
        "'${response.test}' == '123'",
        "'${response.responses.out}' != 'test'"
      ]
    }
  ]
}
type: update
name: Assert action - script action assert
onInstall:
- cmd [cp]: echo test
- script:
  - return {
  - "   result : 0,"
  - "   test: '123'"
  - "};"
- assert:
  - "'${response.test}' == '123'"
  - "'${response.responses.out}' != 'test'"
Result screen:

sleep
Setting a delay that is measured in milliseconds. The following example shows how to create a delay for one second.
sleep: 1000
{
  "sleep": "1000"
}
sleep action can be set like in example before:
sleep:
  milliseconds: 1000
{
  "sleep": {
    "milliseconds": "1000"
  }
}
install
The install action allows to declare multiple installations within a single JPS manifest file in synchronous and asynchronous mode. The action is available for the install and update installation types, therefore, it can initiate installation of both new environments and add-ons.
The simplest record for install action is described like in example below:
type: update
name: Install action

onInstall:
  install: http://example.com/manifest.jps
{
  "type": "update",
  "name": "Install action",
  "onInstall": {
    "install": "http://example.com/manifest.jps"
  }
}
install action can be set by string.
Also there is an ability to set a few external manifests inside one install action in one array. Such a type of installation is performed asynchronously. For example:
type: update
name: Install action

onInstall:
  install:
    - http://example.com/manifest.jps
    - http://example.com/manifest2.jps
{
  "type": "update",
  "name": "Install action",
  "onInstall": {
    "install": [
      "http://example.com/manifest.jps",
      "http://example.com/manifest2.jps"
      ]
  }
}
The next example describes installing the add-on via the external link (with the update installation type) with additional parameters.
type: update
name: Install action

onInstall:
  install:
    jps: "http://example.com/manifest.jps"
    settings:
      myparam: test
{
  "type": "update",
  "name": "Install action",
  "onInstall": {
    "install": {
      "jps": "http://example.com/manifest.jps",
      "settings": {
        "myparam": "test"
      }
    }
  }
}
You can install multiple add-ons via external links with additional parameters in both synchronous and asynchronous mode.
Synchronous installation. It can be used when the add-ons must be installed one by one since one add-on is dependant from another.
type: update
name: Install action

onInstall:
  - install:
      jps: http://example.com/manifest1.jps
      settings:
        myparam: test1

  - install:
      jps: http://example.com/manifest2.jps
      settings:
        myparam: test2
{
  "type": "update",
  "name": "Install action",
  "onInstall": [
    {
      "install": {
        "jps": "http://example.com/manifest1.jps",
        "settings": {
          "myparam": "test1"
        }
      }
    },
    {
      "install": {
        "jps": "http://example.com/manifest2.jps",
        "settings": {
          "myparam": "test2"
        }
      }
    }
  ]
}
Asynchronous installation inside one install action in one array. So both manifests will be installing in parallel with own custom parameters.
type: update
name: Install action

onInstall:
  install:
    - jps: http://example.com/manifest1.jps
      settings:
        myparam: test1

    - jps: http://example.com/manifest2.jps
      settings:
        myparam: test2
{
  "type": "update",
  "name": "Install action",
  "onInstall": {
    "install": [
      {
        "jps": "http://example.com/manifest1.jps",
        "settings": {
          "myparam": "test1"
        }
      },
      {
        "jps": "http://example.com/manifest2.jps",
        "settings": {
          "myparam": "test2"
        }
      }
    ]
  }
}
where:
jps- URL to your custom JPS manifestsettings- user custom parameters
The nodeGroup filtering can be applied to the install action in order to carry out addon installation on different layers within one environment.
type: update
name: Install action

onInstall:
  install[cp,bl]:
    jps: http://example.com/manifest.jps
    log: Test Async Install By Node Group
{
  "type": "update",
  "name": "Install action",
  "onInstall": {
    "install[cp,bl]": {
      "jps": "http://example.com/manifest.jps",
      "log": "Test Async Install By Node Group"
    }
  }
}
Installing the add-on from the local manifest file.
type: update
name: Install action

onInstall:
  install:
    type: update
    name: test
    onInstall:
      log: install test
{
  "type": "update",
  "name": "Install action",
  "onInstall": {
    "install": {
      "type": "update",
      "name": "test",
      "onInstall": {
        "log": "install test"
      }
    }
  }
}
You can install multiple add-ons from the local manifest in both synchronous and asynchronous mode.
Synchronous installation. It can be used when the add-ons must be installed one by one since one add-on is dependant from another.
type: update
name: Install action

onInstall:
  - install:
      type: update
      name: test1
      onInstall:
        log: install test1
  - install:
      type: update
      name: test2
      onInstall:
        log: install test2
{
  "type": "update",
  "name": "Install action",
  "onInstall": [
    {
      "install": {
        "type": "update",
        "name": "test1",
        "onInstall": {
          "log": "install test1"
        }
      }
    },
    {
      "install": {
        "type": "update",
        "name": "test2",
        "onInstall": {
          "log": "install test2"
        }
      }
    }
  ]
}
Two addons asynchronous installation from the two local manifests inside one install action in one array. So both manifests will be installing in parallel.
type: update
name: Install action
onInstall:
  install:
    - type: update
      name: test1
      onInstall:
        log: install test1

    - type: update
      name: test2
      onInstall:
        log: install test2
{
  "type": "update",
  "name": "Install action",
  "onInstall": [
    {
      "install": {
        "type": "update",
        "name": "test1",
        "onInstall": {
          "log": "install test1"
        }
      }
    },
    {
      "install": {
        "type": "update",
        "name": "test2",
        "onInstall": {
          "log": "install test2"
        }
      }
    }
  ]
}
where:
onInstall- entry point for performed actions
Installing the environment via the external link (with the install installation type).
type: update
name: Install action

onInstall:
  install:
    jps: http://example.com/manifest.jps
    envName: env-${fn.random}
    settings:
      myparam: test
{
  "type": "update",
  "name": "Install action",
  "onInstall": {
    "install": {
      "jps": "http://example.com/manifest.jps",
      "envName": "env-${fn.random}",
      "settings": {
        "myparam": "test"
      }
    }
  }
}
Multiple environment installations are also possible via external links in both synchronous and asynchronous mode.
Synchronous installation. It can be used when the environments must be installed one by one since one environment is dependant from another.
type: update
name: Install action

onInstall:
  - install:
      jps: http://example.com/manifest1.jps
      envName: env1-${fn.random}
      settings:
        myparam: test1

  - install:
      jps: http://example.com/manifest2.jps
      envName: env2-${fn.random}
      settings:
        myparam: test2
{
  "type": "update",
  "name": "Install action",
  "onInstall": [
    {
      "install": {
        "jps": "http://example.com/manifest1.jps",
        "envName": "env1-${fn.random}",
        "settings": {
          "myparam": "test1"
        }
      }
    },
    {
      "install": {
        "jps": "http://example.com/manifest2.jps",
        "envName": "env2-${fn.random}",
        "settings": {
          "myparam": "test2"
        }
      }
    }
  ]
}
Asynchronous installation inside one install action in one array. So both manifests will be installing in parallel.
type: update
name: Install action

onInstall:
  install:
    - jps: http://example.com/manifest1.jps
      envName: env1-${fn.random}
      settings:
        myparam: test1

    - jps: http://example.com/manifest2.jps
      envName: env2-${fn.random}
      settings:
        myparam: test2
{
  "type": "update",
  "name": "Install action",
  "onInstall": {
    "install": [
      {
        "jps": "http://example.com/manifest1.jps",
        "envName": "env1-${fn.random}",
        "settings": {
          "myparam": "test1"
        }
      },
      {
        "jps": "http://example.com/manifest2.jps",
        "envName": "env2-${fn.random}",
        "settings": {
          "myparam": "test2"
        }
      }
    ]
  }
}
where:
jps- URL to your custom JPS manifestenvName- short domain name of a new environmentsettings- user custom form
Installing the environment from the local manifest file.
type: update
name: Install action

onInstall:
  install:
    type: install
    region: dev
    envName: env-${fn.random}
    name: test
    nodes:
      nodeType: apache2
      cloudlets: 16
    onInstall:
      log: install test
{
  "type": "update",
  "name": "Install action",
  "onInstall": {
    "install": {
      "type": "install",
      "region": "dev",
      "envName": "env-${fn.random}",
      "name": "test",
      "nodes": {
        "nodeType": "apache2",
        "cloudlets": 16
      },
      "onInstall": {
        "log": "install test"
      }
    }
  }
}
You can install multiple environments from the local manifest in both synchronous and asynchronous mode.
Synchronous installation. It can be used when the environments must be installed one by one since one environments is dependant from another.
type: update
name: Install action

onInstall:
  - install:
        type: install
        region: dev1
        envName: env-${fn.random}
        name: test1
        nodes:
        nodeType: apache2
        cloudlets: 16
        onInstall:
        log: install test1
  - install:
        type: install
        region: dev2
        envName: env-${fn.random}
        name: test2
        nodes:
        nodeType: nginx
        cloudlets: 16
        onInstall:
        log: install test2
{
  "type": "update",
  "name": "Install action",
  "onInstall": [
    {
      "install": {
        "type": "install",
        "region": "dev1",
        "envName": "env-${fn.random}",
        "name": "test1",
        "nodes": {
          "nodeType": "apache2",
          "cloudlets": 16
        },
        "onInstall": {
          "log": "install test1"
        }
      }
    },
    {
      "install": {
        "type": "install",
        "region": "dev2",
        "envName": "env-${fn.random}",
        "name": "test2",
        "nodes": {
          "nodeType": "nginx",
          "cloudlets": 16
        },
        "onInstall": {
          "log": "install test2"
        }
      }
    }
  ]
}
Asynchronous installation inside one install action in one array. So both manifests will be installing in parallel.
type: update
name: Install action

onInstall:
  install:
    - type: install
        region: dev1
        envName: env-${fn.random}
        name: test1
        nodes:
          nodeType: apache2
          cloudlets: 16
        onInstall:
          log: install test1
    - type: install
        region: dev2
        envName: env-${fn.random}
        name: test2
        nodes:
          nodeType: nginx
          cloudlets: 16
        onInstall:
          log: install test2
{
  "type": "update",
  "name": "Install action",
  "onInstall": {
    "install": [
      {
        "type": "install",
        "region": "dev1",
        "envName": "env-${fn.random}",
        "name": "test1",
        "nodes": {
          "nodeType": "apache2",
          "cloudlets": 16
        },
        "onInstall": {
          "log": "install test1"
        }
      },
      {
        "type": "install",
        "region": "dev2",
        "envName": "env-${fn.random}",
        "name": "test2",
        "nodes": {
          "nodeType": "nginx",
          "cloudlets": 16
        },
        "onInstall": {
          "log": "install test2"
        }
      }
    ]
  }
}
where:
region- hardware node's regionenvName- short domain name of a new environmentname- JPS namenodes- nodes descriptiononInstall- entry point for performed actions
installAddon
You can install a custom add-on within another - parent manifest. By default, custom add-ons have the update installation type.
Thus, the custom add-on can be installed to the:
-
existing environment with the update installation type
-
new environment with the install installation type. In this case, add-ons (if there are several ones) are installed sequentially one by one right after a new environment creation.
The example below shows how to pass the add-on identifier to the installAddon action. This add-on's parameters are described in the addons section. As a result, the custom add-on with the firstAddon identifier initiates the creation of a new file in the tmp directory on the compute node layer.
type: update
name: Install Add-on example

onInstall:
  installAddon:
    id: firstAddon

addons:
  - id: firstAddon
    name: firstAddon
    onInstall:
      createFile [cp]: /tmp/exampleFile.txt
{
    "type": "update",
    "name": "Install Add-on example",
    "onInstall": {
        "installAddon": {
            "id": "firstAddon"
        }
    },
    "addons": [{
        "id": "firstAddon",
        "name": "firstAddon",
        "onInstall": {
            "createFile [cp]": "/tmp/exampleFile.txt"
        }
    }]
}
id- identifier of a custom add-on
You can locate the installed add-ons within the Add-ons tab at the Jelastic dashboard.

In the following example, the nodeGroup parameter is passed to the installAddon action, targeting the add-on at the balancer (bl) node group.
installAddon:
  id: firstAddon
  nodeGroup: bl
{
  "installAddon": {
    "id": "firstAddon",
    "nodeGroup": "bl"
  }
}
The action installAddon has the default parameter called id.
For more details about the add-ons installation, visit the linked page.
return
The action allows to return any string or object of values. As a result, the response is displayed via the pop-up window. By default, the error pop-up window is used.
Example
type: update
name: Return Action

onInstall:
  return: Hello World!
{
    "type": "update",
    "name": "Return Action",
    "onInstall": {
        "return": "Hello World!"
    }
}
Through the example above, the pop-up window with the following text is returned.

The installation is not completed and the following installation window is displayed.
If the return action includes a string, then the response is displayed via the error pop-up window like in the screen-shot below.
type: update
name: Return Action

onInstall:
  return: |
    {"message": "${nodes.cp.id}", "type": "success"}
{
    "type": "update",
    "name": "Return Action",
    "onInstall": {
        "return": "{\"message\": \"${nodes.cp.id}\",\"type\": \"success\"}"
    }
}
The result window also returns the compute node's unique identifier at Jelastic Platform.

If the action returns an object, a response code can be redefined. So the message or result code parameters are required in the return object. Herewith, a zero (0) result code is not passed to the response code.
Through the following example, a success message with a compute node identifier is displayed.
type: update
name: Return Action

onInstall:
  return:
    type: success
    message: Compute node unique identifier - ${nodes.cp.id}
{
  "type": "update",
  "name": "Return Action",
  "onInstall": {
    "return": {
      "type": "success",
      "message": "Compute node unique identifier - ${nodes.cp.id}"
    }
  }
}
For more details about Custom Response, visit the linked page.
All the other actions within the onInstall array are not executed after the return action.
type: update
name: Return Action

onInstall:
  - return:
      type: success
      message: Compute node unique identifier - ${nodes.cp.id}
  - restartNodes [cp]
{
    "type": "update",
    "name": "Return Action",
    "onInstall": [{
            "return": {
                "type": "success",
                "message": "Compute node unique identifier - ${nodes.cp.id}"
            }
        },
        "restartNodes [cp]"
    ]
}
Therefore, the restartNodes action is not run to restart a compute node.
Custom Actions
Particular actions can be run by means of calling actions with different parameters.
The example below shows how to create a new file (e.g. the example.txt file in the tmp directory) by running a createFile action on the compute node.
type: update
name: execution actions

onInstall:
  createFile [cp]: /tmp/example.txt
{
  "type": "update",
  "name": "execution actions",
  "onInstall": {
    "createFile [cp]": "/tmp/example.txt"
  }
}
createFile- corresponding createFile action
The next example illustrates how to create a new custom action (i.e. customAction) that can be called for several times.
type: update
name: execution actions
onInstall: customAction

actions:
  customAction:
    createFile [cp]: /tmp/example.txt
{
    "type": "update",
    "name": "execution actions",
    "onInstall": "customAction",
    "actions": {
        "customAction": {
            "createFile [cp]": "/tmp/example.txt"
        }
    }
}
actions- object where custom actions can be predefined
Action Placeholders
In order to access any required data or parameters of allocated resources inside a manifest, a special set of placeholders should be used. The parameters, sent to a call method, are transformed into a separate kit of placeholders, which can be further used within the appropriate actions by means of ${this} namespace. Access to a node inside environment can be gained according to its type, as well as according to its role in the environment.
The example below illustrates how to pass the dynamic parameters for running in the action. Here, the name parameter is sent to customAction where the createFile action is executed.
type: update
name: $this in Custom Actions

onInstall:
  customAction:
    name: simpleTxtFile

actions:
  customAction:
    createFile [cp]: /tmp/${this.name}.txt
{
    "type": "update",
    "name": "$this in Custom Actions",
    "onInstall": {
        "customAction": {
            "name": "simpleTxtFile"
        }
    },
    "actions": {
        "customAction": {
            "createFile [cp]": "/tmp/${this.name}.txt"
        }
    }
}
Code Reuse
You can use the already-existing code to perform a new action.
For example, outputting Hello World! twice in the greeting.txt.
type: update
name: Actions Example

onInstall:
  - createFile [cp]: ${SERVER_WEBROOT}/greeting.txt
  - greeting
  - greeting

actions:
  greeting:
    appendFile [cp]:
      - path: ${SERVER_WEBROOT}/greeting.txt
        body: Hello World!
{
  "type": "update",
  "name": "Actions Example",
  "onInstall": [
    {
      "createFile [cp]": "${SERVER_WEBROOT}/greeting.txt"
    },
    "greeting",
    "greeting"
  ],
  "actions": {
    "greeting": {
      "appendFile [cp]": [
        {
          "path": "${SERVER_WEBROOT}/greeting.txt",
          "body": "Hello World!"
        }
      ]
    }
  }
}
Call Action with Parameters
The following example shows how to pass additional parameters to the custom action. The parameters should be passed as an object to the custom action.
type: update
name: execution actions

onInstall:
  customAction:
    fileName: example.txt

actions:
  customAction:
    createFile [cp]: /tmp/${this.fileName}.txt
{
    "type": "update",
    "name": "execution actions",
    "onInstall": {
        "customAction": {
            "fileName": "example.txt"
        }
    },
    "actions": {
        "customAction": {
            "createFile [cp]": "/tmp/${this.fileName}.txt"
        }
    }
}
fileName- additional parameter
Writing Hello World! and outputting the first and the second compute nodes IP addresses.
type: update
name: Action Example

onInstall:
  - createFile [cp]: ${SERVER_WEBROOT}/greeting.txt
  - greeting
  - greeting
  - log:
      message: ${nodes.cp[0].address}
  - log:
      message: ${nodes.cp[1].address}

actions:
  greeting:
    appendFile [cp]:
      path: ${SERVER_WEBROOT}/greeting.txt
      body: Hello World!
  log:
    appendFile [cp]:
      path: ${SERVER_WEBROOT}/greeting.txt
      body: ${this.message}
{
  "type": "update",
  "name": "Action Example",
  "onInstall": [
    {
      "createFile [cp]": "${SERVER_WEBROOT}/greeting.txt"
    },
    "greeting",
    "greeting",
    {
      "log": {
        "message": "${nodes.cp[0].address}"
      }
    },
    {
      "log": {
        "message": "${nodes.cp[1].address}"
      }
    }
  ],
  "actions": {
    "greeting": {
      "appendFile [cp]": {
        "path": "${SERVER_WEBROOT}/greeting.txt",
        "body": "Hello World!"
      }
    },
    "log": {
      "appendFile [cp]": {
        "path": "${SERVER_WEBROOT}/greeting.txt",
        "body": "${this.message}"
      }
    }
  }
}
stopEvent
Any triggered event execution can be stopped and action can be accompanied with message displayed at right top corner.
For example:
type: install
name: stopEvent Test

settings:
  fields:
    type: checkbox
    name: restart
    caption: App Server Restart Allow
    default: true

nodes:
  - nodeType: apache2
    nodeGroup: cp
    count: 1
    cloudlets: 4
  - nodeType: nginx
    nodeGroup: bl
    count: 1
    cloudlets: 4

onBeforeRestartNode[cp]:
  if ( ${settings.restart} == false ):
      stopEvent:
        type: warning
        message: Restart is prohibited.
{
  "type": "install",
  "name": "stopEvent Test",
  "settings": {
    "fields": {
      "type": "checkbox",
      "name": "restart",
      "caption": "App Server Restart Allow",
      "default": true
    }
  },
  "nodes": [
    {
      "nodeType": "apache2",
      "nodeGroup": "cp",
      "count": 1,
      "cloudlets": 4
    },
    {
      "nodeType": "nginx",
      "nodeGroup": "bl",
      "count": 1,
      "cloudlets": 4
    }
  ],
  "onBeforeRestartNode[cp]": {
    "if ( ${settings.restart} == false )": {
      "stopEvent": {
        "type": "warning",
        "message": "Restart is prohibited."
      }
    }
  }
}
where:
type[string] - message type to be displayed:- error

- warning

- error
message[string] - text of the message
Once the stopEvent action is executed it outputs an error to the console.
For example:

What’s next?
-
See the Events list the actions can be bound to
-
Find out the list of Placeholders for automatic parameters fetching
-
See how to use Conditions and Iterations
-
Read how to integrate your Custom Scripts
-
Learn how to customize Visual Settings
-
Examine a bunch of Samples with operation and package examples